API Playground / Swagger Docs
After generating your backend, AppAsap will automatically generate a Swagger documentation for your backend, this is where you can easily test the output API and also get familiar with what it has to offer.
Using The API Playground
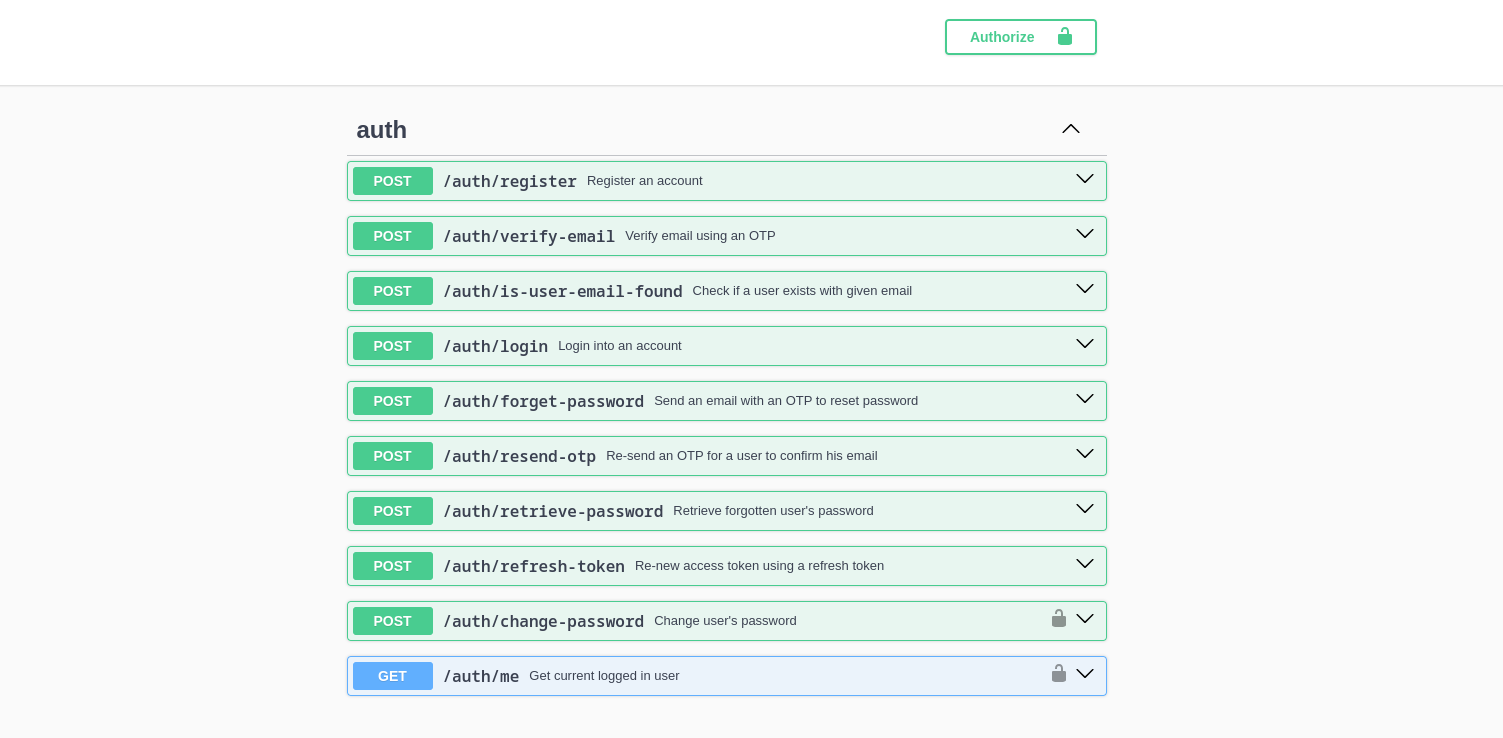
Authentication
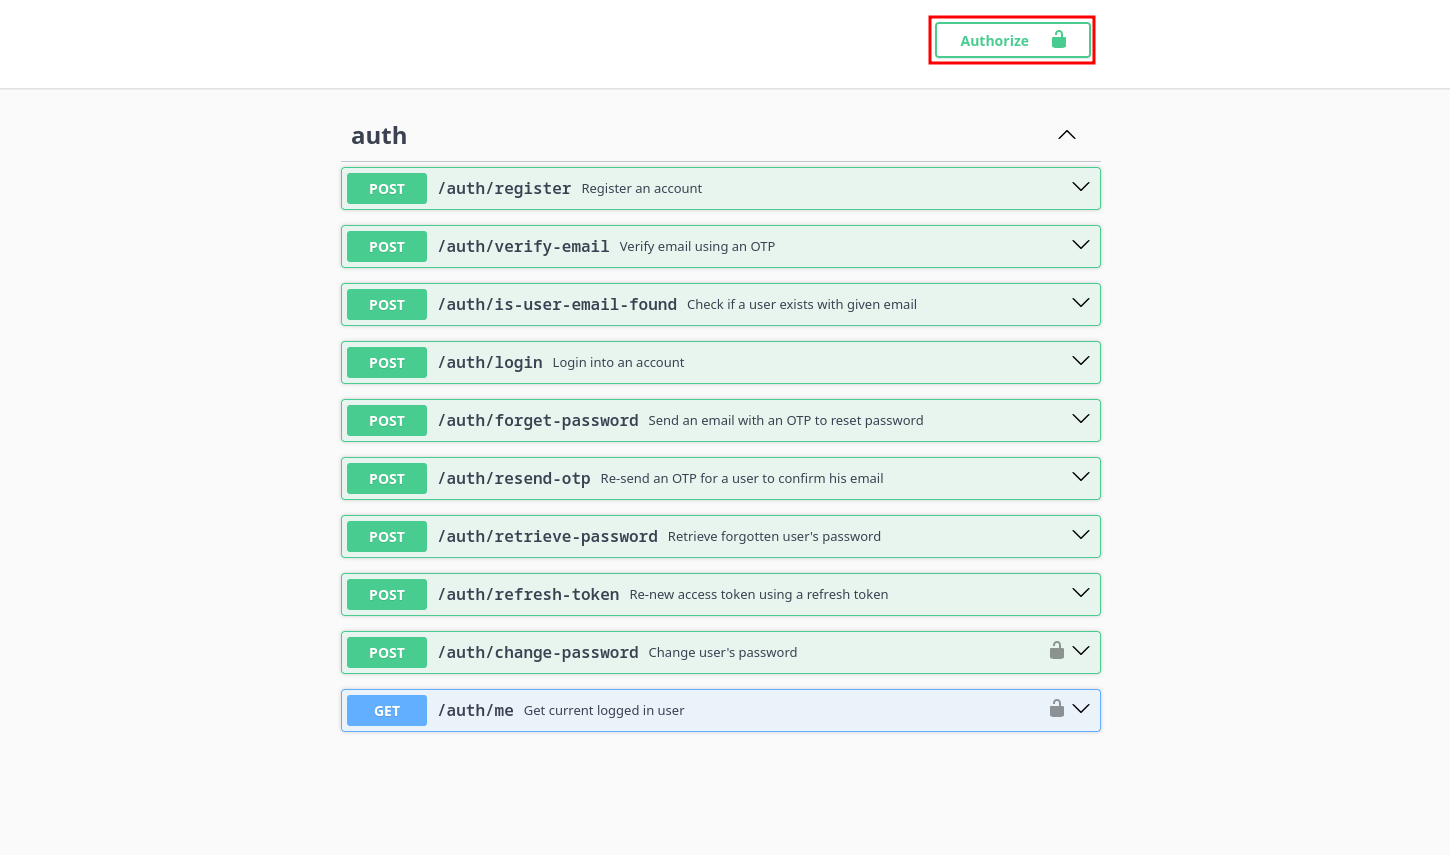
The first set of endpoints you are going to see in the generated Swagger docs is Authentication, authentication is stateless and is done using JWT, you will be required to send a valid token along side with your requests and by default all endpoints will be protected resources and can't be accessed before authenticating, except the endpoints where it doesn't make sense to be protected (e.g. /auth/register).
Note that after you generate an application and set the password for the admin user, you will be automatically logged in to the Admin CMS and the API Playground.
Automatic Token
If you are ever logged out of the Admin CMS, After you re-login to it, if you navigate to API Playground for the first time, you should get a token that you can use to authorize yourself automatically.
Otherwise, to log in you will need to use the Swagger /auth/login endpoint, follow the log in flow from this.
Creating an Account
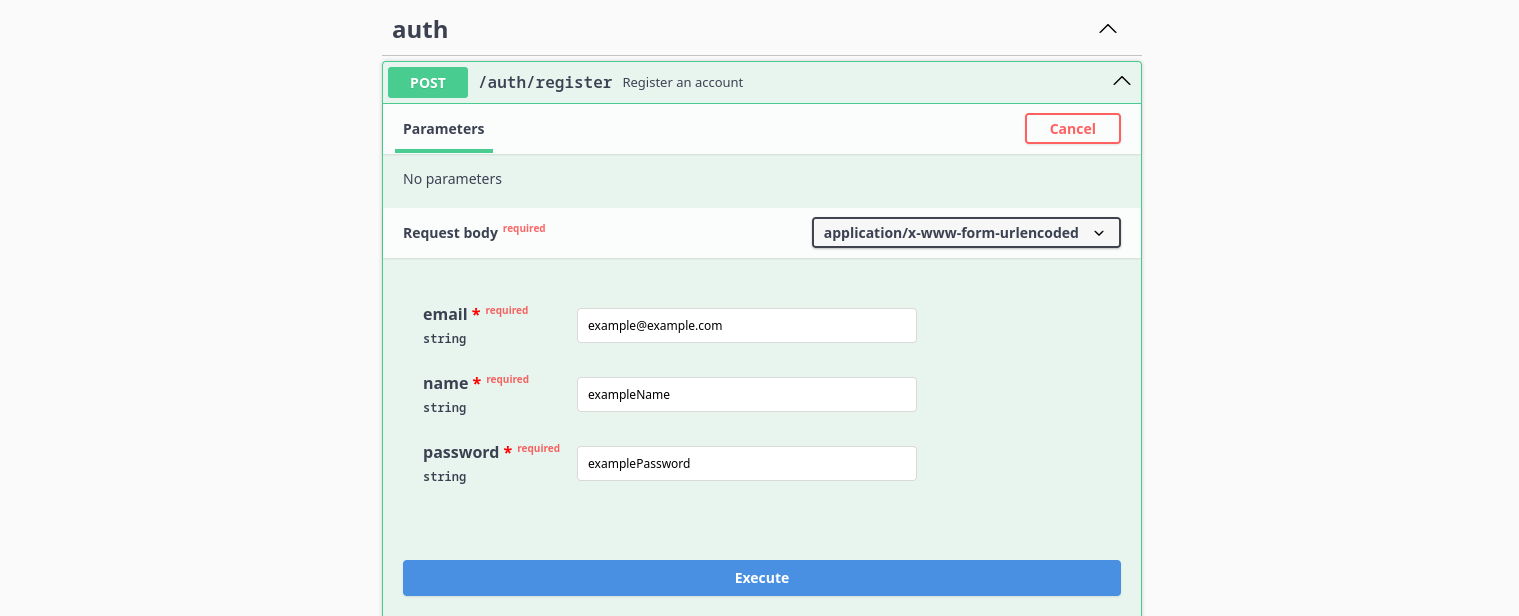
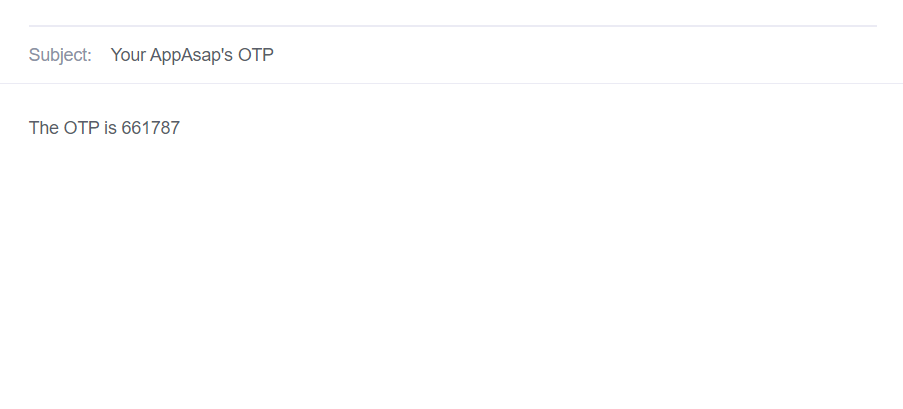
Firstly, you need to use the /auth/register endpoint to register an account (or if you already did, start from the login step), then you will receive an email with an OTP to confirm your account:
The message containing the OTP:
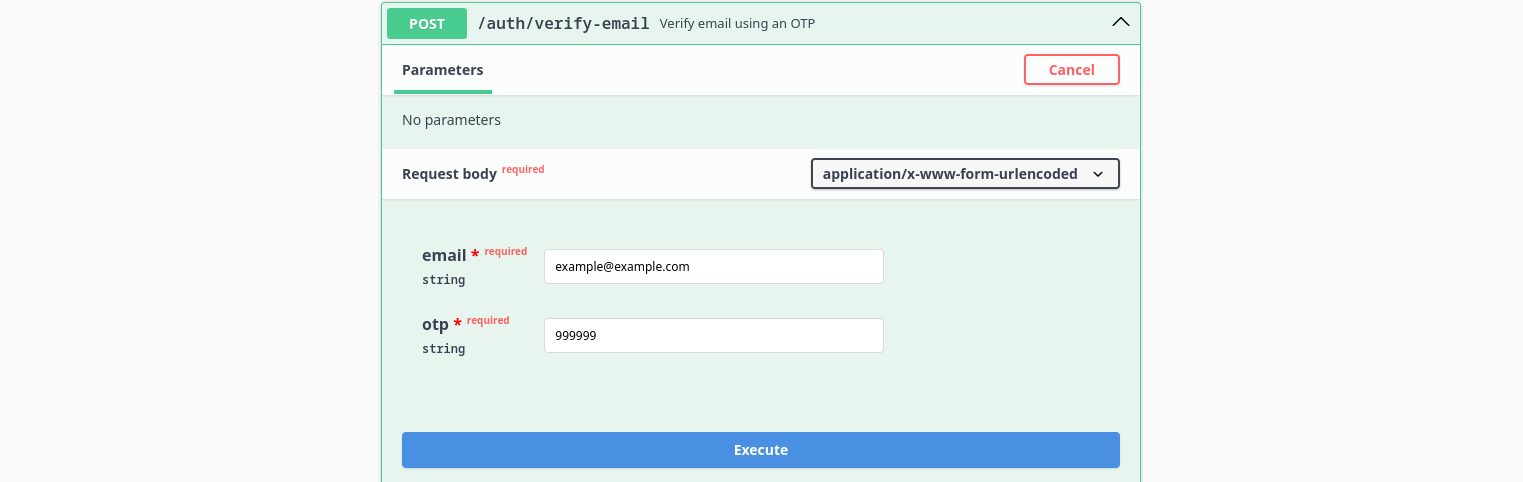
You should take the OTP from the email and proceed to verifying your email through the /auth/verify-email endpoint by providing it with the email and the OTP received:
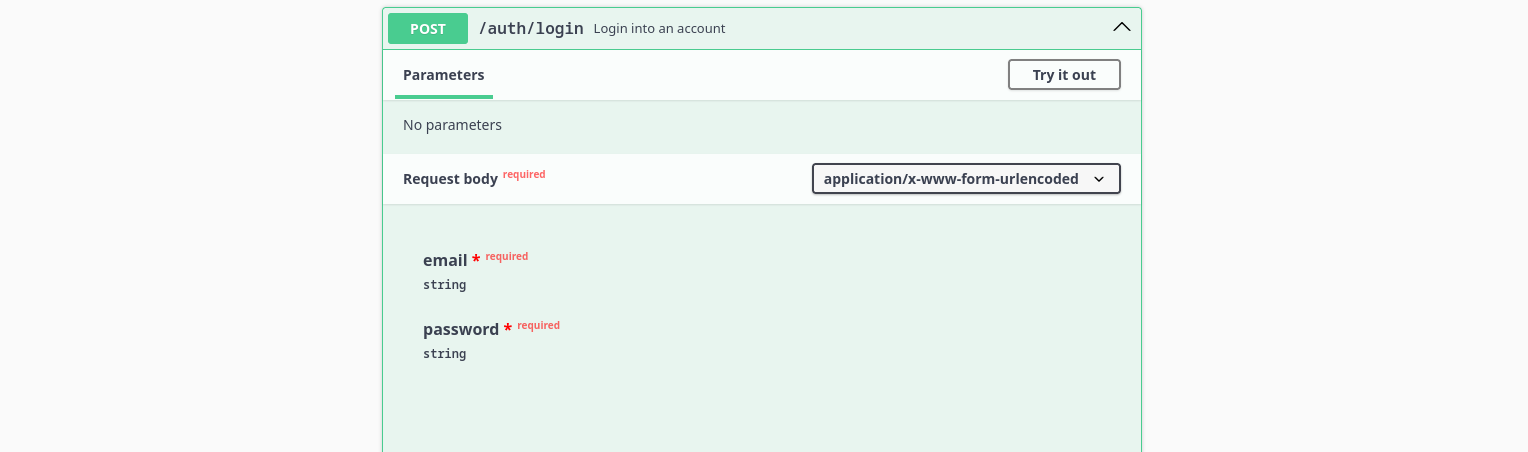
It will respond with a message confirming the email verification, next step is to log in using the /auth/login endpoint:
After loggin in, you will receive a response looking like this:
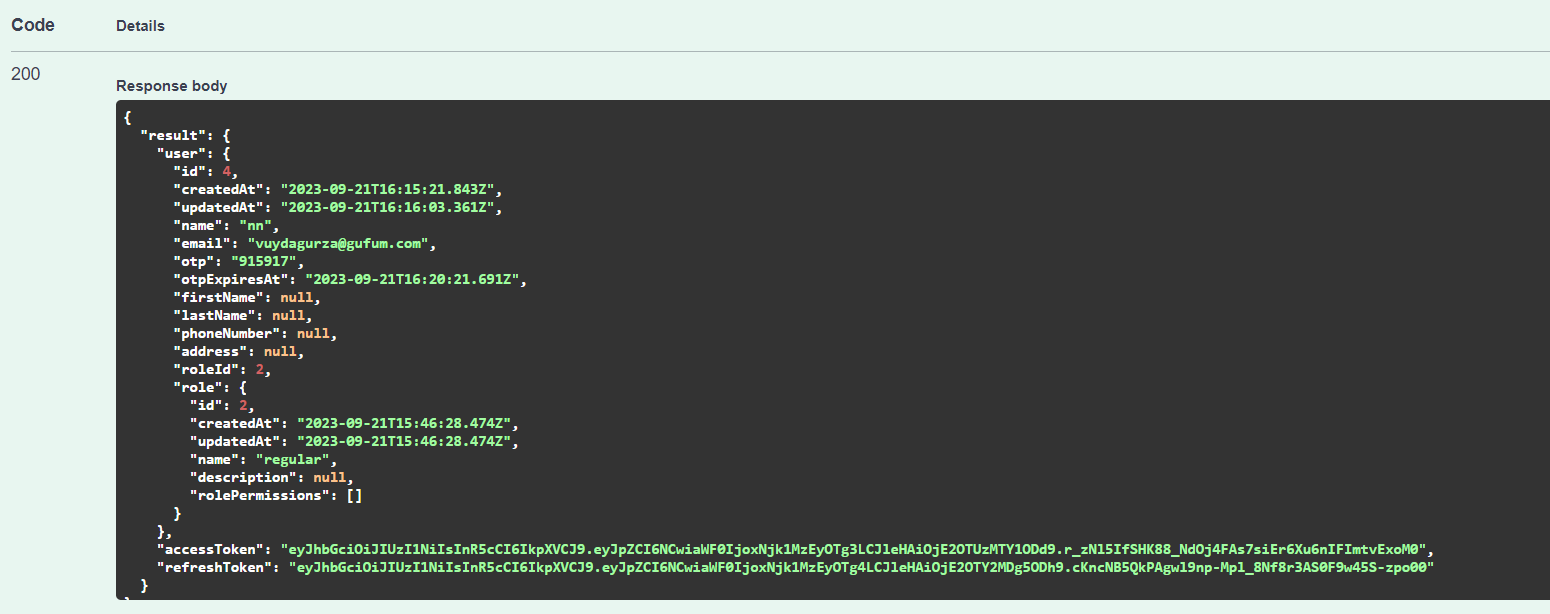
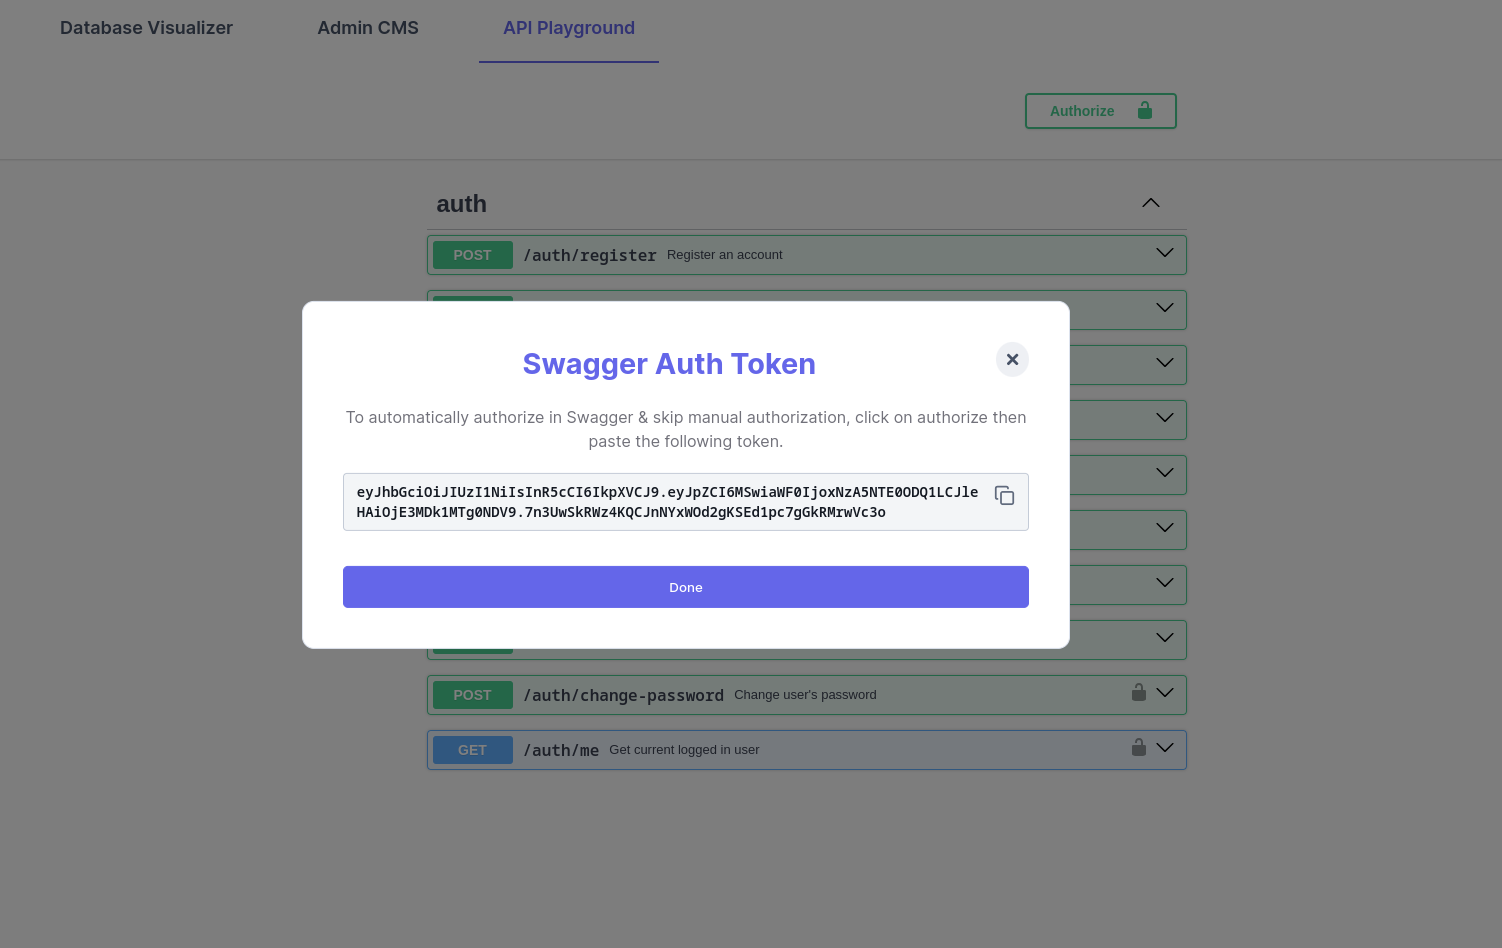
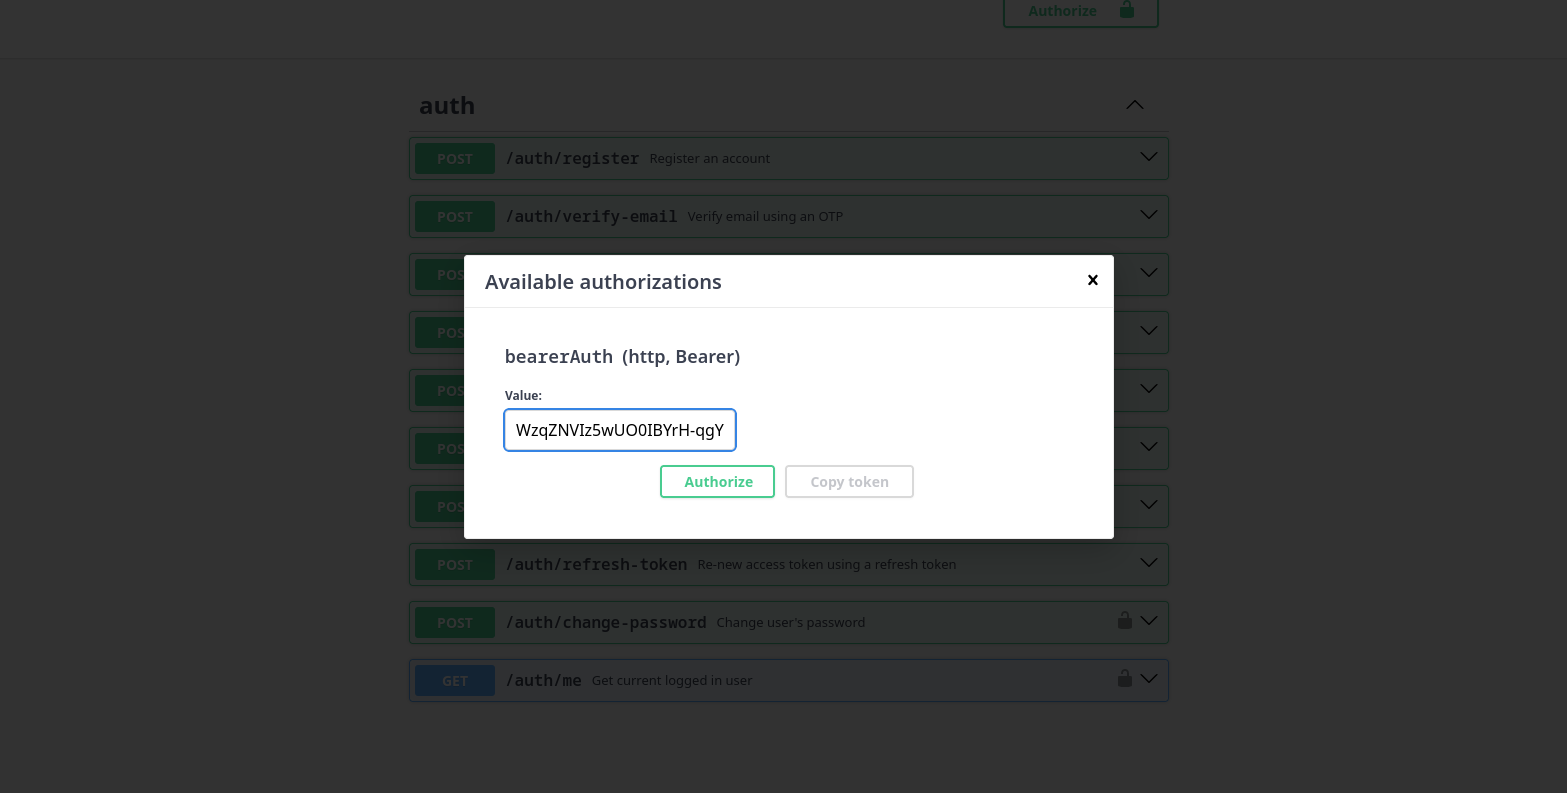
As you can see, you get an access_token in the response body, you will use this to authorize/identify yourself and to access protected routes/operations. So the final setp is to actually authorize yourself using this access_token, you need to COPY the token and paste it in the authorize button at the top right:
Copy/Paste the token and click on Authorize.
External Authorization Token
Now, you are ready to fully interact with all of the API's endpoints, even protected resources. Swagger will automatically start providing this token on each request in an authorization header, but you can also provide it manually if you issue a request outside of Swagger by providing an authorization header containing the auth token in the form:
- cURL
- Fetch API
curl -H 'Authorization: Bearer <your_auth_token>' ...
const response = await fetch('http://<your_API_url>/todo', {
  headers: {
    authorization: 'Bearer <your_auth_token>'
  },
  ...
});

const data = await response.json();

console.log(data);
Your API URL
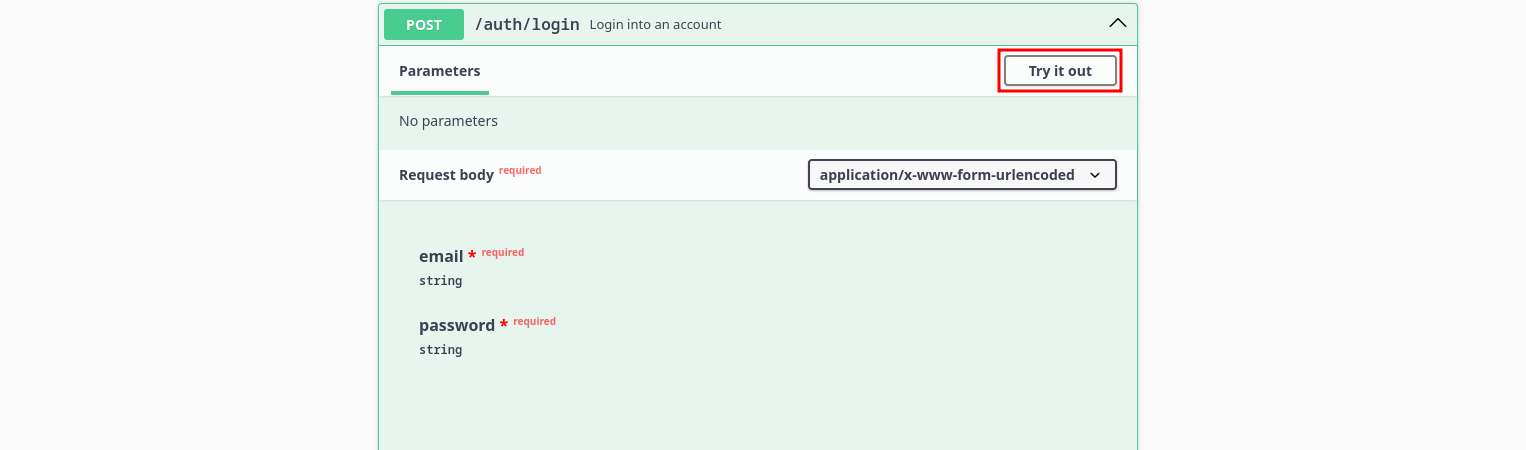
If you want to issue an external request you need to get your API url, to do that you need to issue a dummy request using any Swagger endpoint for example the /auth/login, just expand it and click on Try it out:
Then click on Execute:
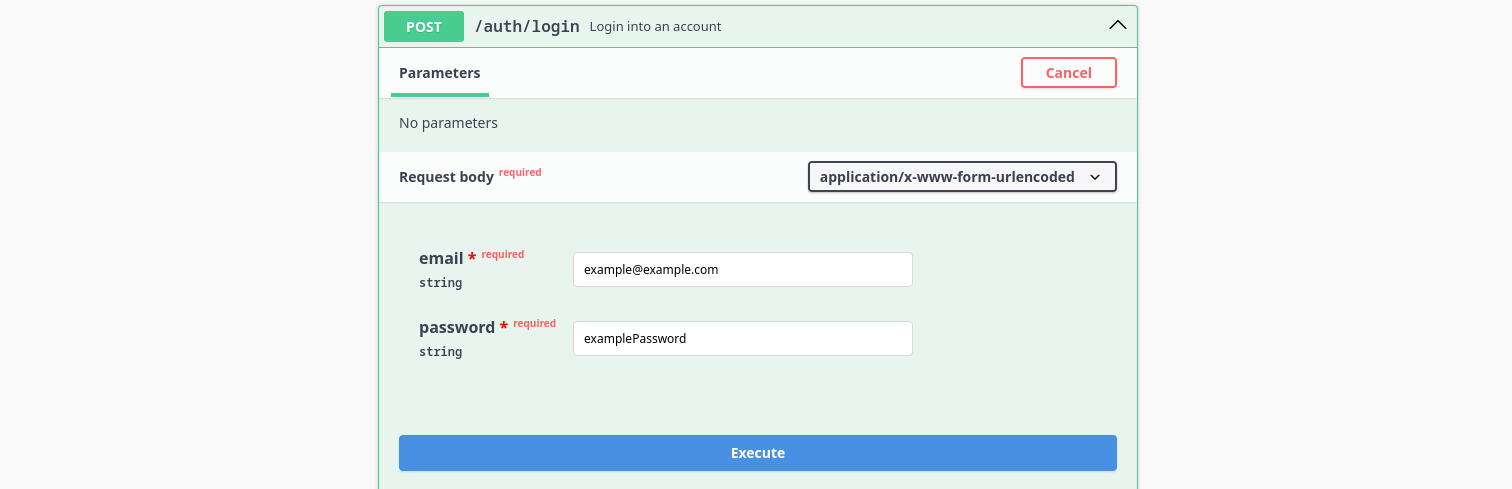
The request should fail, but it doesn't matter, Swagger should tell you where did the request go (the request URL), copy your API URL and use it as you wish:

You will only need the part before the /auth/login. This is your API URL.
Structure
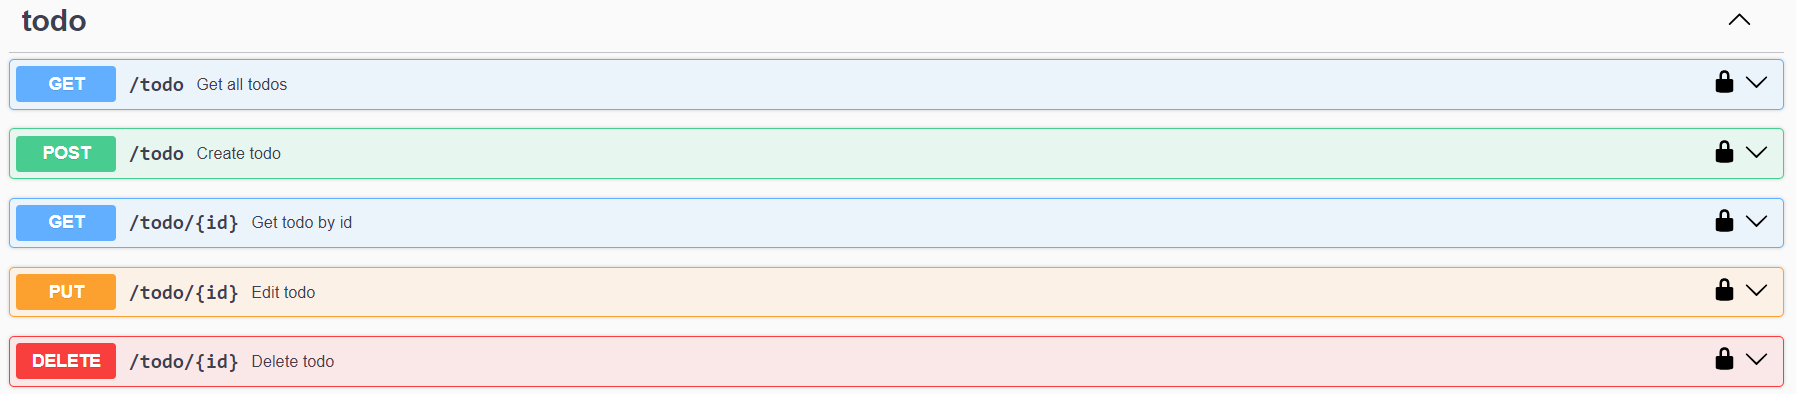
For almost all entities in your generated API you will have a way to perform CRUD operations on these entities, for example this is a todo resource:
let's take a look at how each of these work:
1. GET /resource
This will allow you to query your resource in a flexible and customizable way:
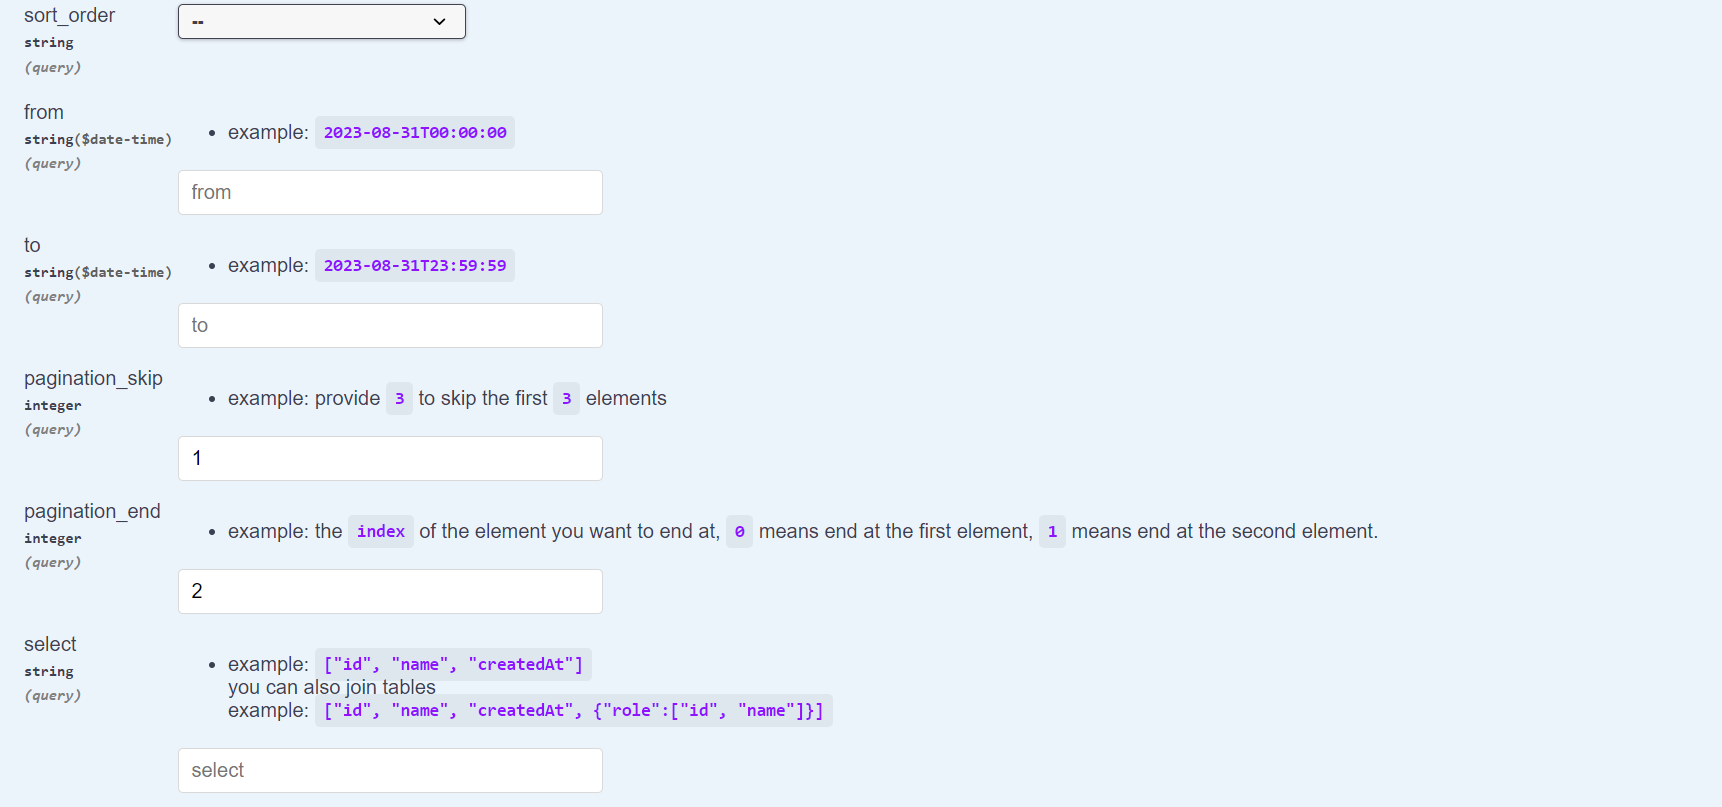
As you can see, you get a lot of options to customize the way you query your list of resource, you can filter, paginate, sort, range_query, and more. It is easy to perform this using the Swagger interface, but it is not exclusive to that of course, you can perform your request using any external HTTP client.
- cURL
- Fetch API
curl -X 'GET' \
  'http://<your_API_url>/todo' \
  -H 'accept: */*' \
  -H 'Authorization: Bearer eyJhbGciOiJIUzI1NiIsInR5cCI6IkpXVCJ9.eyJpZCI6MSwiaWF0IjoxNjk1NTQ4MzY3LCJleHAiOjE2OTU1NTE5Njd9.Z1Nx-jWDDGFSk_xsR5FpIQA7vfFRBw42ejY_P6YHmSA'
const response = await fetch("http://<your_API_url>/todo", {
  headers: {
    authorization:
      "Bearer eyJhbGciOiJIUzI1NiIsInR5cCI6IkpXVCJ9.eyJpZCI6MSwiaWF0IjoxNjk1NTU4OTM3LCJleHAiOjE2OTU1NjI1Mzd9.FPCVSf_akdRPvBQO7Jmeu7_GlX2zVquNbHtx0TAjxKM",
  },
});

const data = await response.json();

console.log(data);
This is the simplest form of a GET request that you make on an entity, you can also provide more options inside query parameters, for example that would be the URL (with sorting and pagination):
http://localhost:5000/todo?sort_field=id&sort_order=DESC&pagination_skip=2&pagination_end=10
Don't forget to provide the correct token inside the authorization header, also you can change the resource name as you wish instead of /todo.
Sorting
This is an example on how to retrieve sorted data in a GET Many request, you can sort by a specific column ASC or DESC by controling the sort_field and sort_order query parameters.
This gets all rows (in our case the todos) sorted by id in a DESC order (descending).
- cURL
- Fetch API
curl -X 'GET' \
  'http://<your_API_url>/todo?sort_field=id&sort_order=DESC' \
  -H 'accept: */*' \
  -H 'Authorization: Bearer eyJhbGciOiJIUzI1NiIsInR5cCI6IkpXVCJ9.eyJpZCI6MSwiaWF0IjoxNjk4MzMzMzIzLCJleHAiOjE2OTgzMzY5MjN9.Asa0g6yNvyxPMxTfdZOchAHk0HPsCJMkbmJdO8t5qY8'
const response = await fetch(
  "http://<your_API_url>/todo?sort_field=id&sort_order=DESC",
  {
    method: "GET",
    headers: {
      authorization:
        "Bearer eyJhbGciOiJIUzI1NiIsInR5cCI6IkpXVCJ9.eyJpZCI6MSwiaWF0IjoxNjk4MzMzMzIzLCJleHAiOjE2OTgzMzY5MjN9.Asa0g6yNvyxPMxTfdZOchAHk0HPsCJMkbmJdO8t5qY8",
    },
  }
);

const data = await response.json();

console.log(data);
Pagination
This is an example on how to perform data pagination on the list of a specific resource that you retrieve when you use the GET /<resource_name> endpoint.
Pagination is controlled by two query parameters pagination_skip and pagination_end.
- The
pagination_skipis used for skipping the firstNelements. - The
pagination_endis used to specifiy a specific index to stop on (for example: provide25to stop on the26-th element).
- cURL
- Fetch API
curl -X 'GET' \
  'http://<your_API_url>/todo?pagination_skip=1&pagination_end=2' \
  -H 'accept: */*' \
  -H 'Authorization: Bearer eyJhbGciOiJIUzI1NiIsInR5cCI6IkpXVCJ9.eyJpZCI6MSwiaWF0IjoxNjk4MzMzMzIzLCJleHAiOjE2OTgzMzY5MjN9.Asa0g6yNvyxPMxTfdZOchAHk0HPsCJMkbmJdO8t5qY8'
const response = await fetch(
  "http://<your_API_url>/todo?pagination_skip=1&pagination_end=2",
  {
    method: "GET",
    headers: {
      authorization:
        "Bearer eyJhbGciOiJIUzI1NiIsInR5cCI6IkpXVCJ9.eyJpZCI6MSwiaWF0IjoxNjk4MzMzMzIzLCJleHAiOjE2OTgzMzY5MjN9.Asa0g6yNvyxPMxTfdZOchAHk0HPsCJMkbmJdO8t5qY8",
    },
  }
);

const data = await response.json();

console.log(data);
Time-Based Range Queries
This is an example on how to perform time-based range queries on the list of a specific resource that you retrieve when you use the GET /<resource_name> endpoint.
Time range queries are controlled by two query parameters from and to.
Note that you should provide both of them NOT in UTC, but just by providing a range based on your Local Time and the API should handle the rest (example:
2023-08-31T23:59:59).
- The
fromis used to specifiy the starting point in time. - The
tois used to specifiy the last point in time.
- cURL
- Fetch API
curl -X 'GET' \
  'http://<your_API_url>/todo?from=2023-08-31T00%3A00%3A00&to=2023-10-26T23%3A59%3A59' \
  -H 'accept: */*' \
  -H 'Authorization: Bearer eyJhbGciOiJIUzI1NiIsInR5cCI6IkpXVCJ9.eyJpZCI6MSwiaWF0IjoxNjk4MzMzMzIzLCJleHAiOjE2OTgzMzY5MjN9.Asa0g6yNvyxPMxTfdZOchAHk0HPsCJMkbmJdO8t5qY8'
const response = await fetch(
  "http://<your_API_url>/todo?from=2023-08-31T00%3A00%3A00&to=2023-10-26T23%3A59%3A59",
  {
    method: "GET",
    headers: {
      authorization:
        "Bearer eyJhbGciOiJIUzI1NiIsInR5cCI6IkpXVCJ9.eyJpZCI6MSwiaWF0IjoxNjk4MzMzMzIzLCJleHAiOjE2OTgzMzY5MjN9.Asa0g6yNvyxPMxTfdZOchAHk0HPsCJMkbmJdO8t5qY8",
    },
  }
);

const data = await response.json();

console.log(data);
Filtering
This is an example on how to retrieve data that only satisfies a certain filtering criteria on the list of a specific resource that you retrieve when you use the GET /<resource_name> endpoint.
filtering is controlled by the filter query parameter.
for example: to get todos that with a description field containing the string "example2" we would do the following:
Note that the
filterquery parameter for this request is{"description": "example2"}but it needs to get URL-ecoded.
- cURL
- Fetch API
curl -X 'GET' \
  'http://<your_API_url>/todo?filter=%7B%22description%22%3A%20%22example2%22%7D' \
  -H 'accept: */*' \
  -H 'Authorization: Bearer eyJhbGciOiJIUzI1NiIsInR5cCI6IkpXVCJ9.eyJpZCI6MSwiaWF0IjoxNjk4MzMzMzIzLCJleHAiOjE2OTgzMzY5MjN9.Asa0g6yNvyxPMxTfdZOchAHk0HPsCJMkbmJdO8t5qY8'
const response = await fetch(
  "http://<your_API_url>/todo?filter=%7B%22description%22%3A%20%22example2%22%7D",
  {
    method: "GET",
    headers: {
      authorization:
        "Bearer eyJhbGciOiJIUzI1NiIsInR5cCI6IkpXVCJ9.eyJpZCI6MSwiaWF0IjoxNjk4MzMzMzIzLCJleHAiOjE2OTgzMzY5MjN9.Asa0g6yNvyxPMxTfdZOchAHk0HPsCJMkbmJdO8t5qY8",
    },
  }
);

const data = await response.json();

console.log(data);
Select
Last operation you can perform is a select operation similar to how GraphQL works, you can pick certain columns to retrieve and ignore others.
Selection is controlled by the select query param, learn how to perform requests with select in this section.
2. POST /resource
Use this for creating entities.
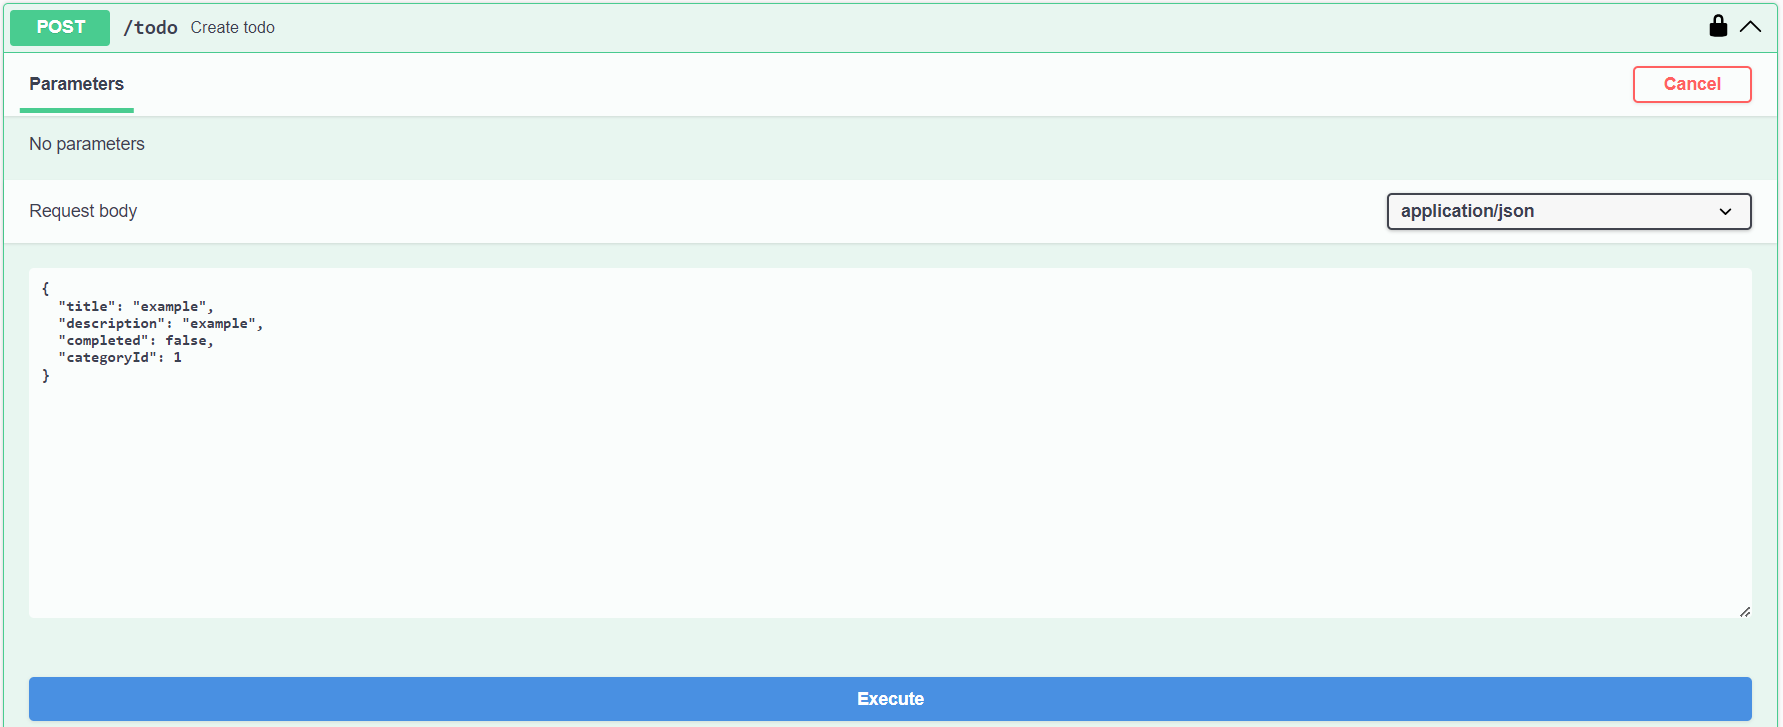
As you see, this todo entity needs a categoryId, which means that there must exist a category before we are able to create a todo, otherwise you will get an error because we are not satisfying foreign key constraints. Otherwise, creating an entity is straight forward.
- cURL
- Fetch API
curl -X 'POST' \
  'http://<your_API_url>/todo' \
  -H 'accept: application/json' \
  -H 'Authorization: Bearer eyJhbGciOiJIUzI1NiIsInR5cCI6IkpXVCJ9.eyJpZCI6MSwiaWF0IjoxNjk1NTU4OTM3LCJleHAiOjE2OTU1NjI1Mzd9.FPCVSf_akdRPvBQO7Jmeu7_GlX2zVquNbHtx0TAjxKM' \
  -H 'Content-Type: application/json' \
  -d '{
  "title": "example",
  "description": "example",
  "completed": false,
  "categoryId": 1
}'
const response = await fetch("http://<your_API_url>/todo", {
  method: "POST",
  headers: {
    authorization:
      "Bearer eyJhbGciOiJIUzI1NiIsInR5cCI6IkpXVCJ9.eyJpZCI6MSwiaWF0IjoxNjk1NTU4OTM3LCJleHAiOjE2OTU1NjI1Mzd9.FPCVSf_akdRPvBQO7Jmeu7_GlX2zVquNbHtx0TAjxKM",
    "Content-Type": "application/json",
  },
  body: JSON.stringify({
    title: "example",
    description: "example",
    completed: false,
    categoryId: 1,
  }),
});

const data = await response.json();

console.log(data);
3. POST using x-www-form-urlencoded
- cURL
- Fetch API
curl -X 'POST' \
  'http://<your_API_url>/todo' \
  -H 'accept: application/json' \
  -H 'Authorization: Bearer eyJhbGciOiJIUzI1NiIsInR5cCI6IkpXVCJ9.eyJpZCI6MSwiaWF0IjoxNjk1NTU4OTM3LCJleHAiOjE2OTU1NjI1Mzd9.FPCVSf_akdRPvBQO7Jmeu7_GlX2zVquNbHtx0TAjxKM' \
  -H 'Content-Type: application/x-www-form-urlencoded' \
  -d 'title=example&description=example&completed=false&categoryId=1'
const response = await fetch("http://<your_API_url>/todo", {
  method: "POST",
  headers: {
    authorization:
      "Bearer eyJhbGciOiJIUzI1NiIsInR5cCI6IkpXVCJ9.eyJpZCI6MSwiaWF0IjoxNjk1NTU4OTM3LCJleHAiOjE2OTU1NjI1Mzd9.FPCVSf_akdRPvBQO7Jmeu7_GlX2zVquNbHtx0TAjxKM",
    "Content-Type": "application/x-www-form-urlencoded",
  },
  body: new URLSearchParams({
    title: "example",
    description: "example",
    completed: false,
    categoryId: 1,
  }),
});

const data = await response.json();

console.log(data);
4. GET /resource/{id}
This endpoint is useful to retrieve a single entity directly.
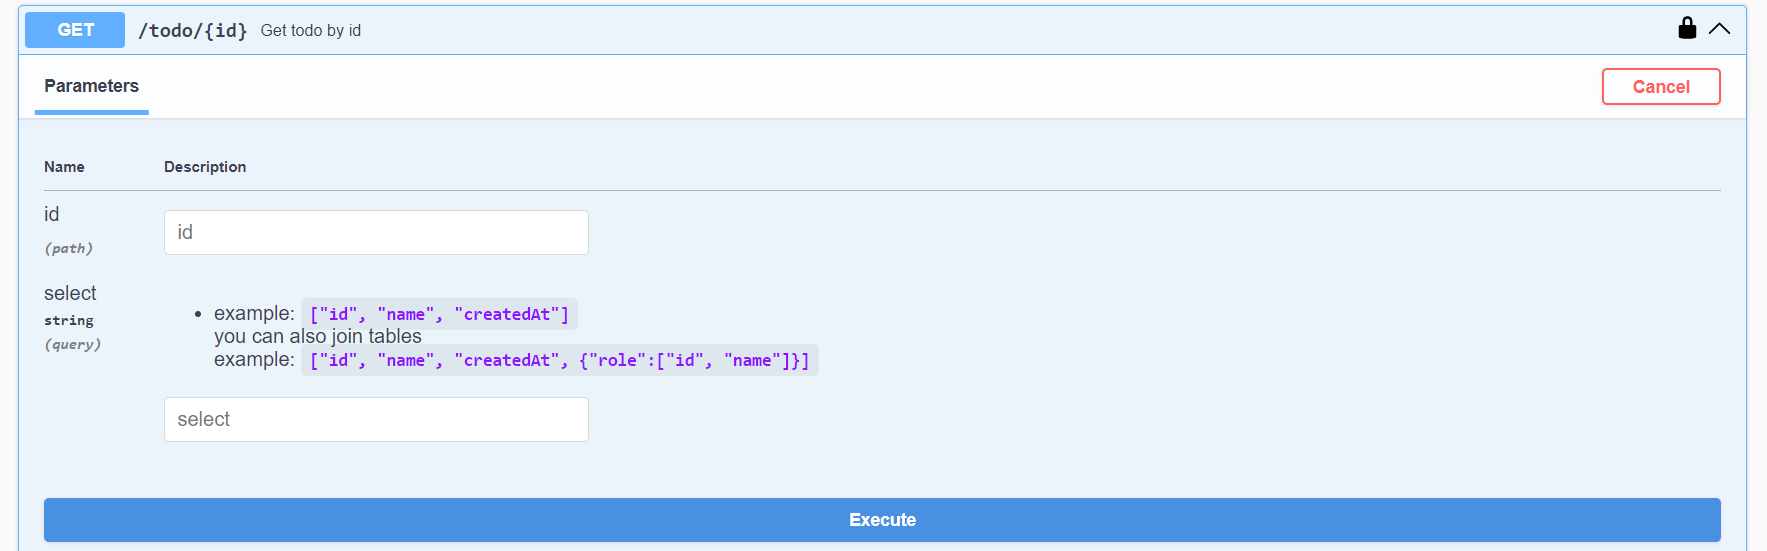
You can also provide an optional select to select specific columns and ignore omit others. If you only need to select a single field maybe name, you can just type it in the select field for the endpoint like this: name, but if you need to select multiple fields you will have to type it as an array, for example: ["name", "age"].
Note that you should provide the
idpath parameter.
Here is an example without select:
- cURL
- Fetch API
curl -X 'GET' \
  'http://localhost:5000/todo/2' \
  -H 'accept: application/json' \
  -H 'Authorization: Bearer eyJhbGciOiJIUzI1NiIsInR5cCI6IkpXVCJ9.eyJpZCI6MSwiaWF0IjoxNjk4MzM4MzcwLCJleHAiOjE2OTgzNDE5NzB9.O2ra-nLrTB5v1VCZhuANcH0MOq-S4ij_HNxjv_9O6Fk'
const response = await fetch("http://<your_API_url>/todo/2", {
  headers: {
    authorization:
      "Bearer eyJhbGciOiJIUzI1NiIsInR5cCI6IkpXVCJ9.eyJpZCI6MSwiaWF0IjoxNjk1NTU4OTM3LCJleHAiOjE2OTU1NjI1Mzd9.FPCVSf_akdRPvBQO7Jmeu7_GlX2zVquNbHtx0TAjxKM",
  },
});

const data = await response.json();

console.log(data);
Or use it with a select query parameter to only retrieve certain columns (this example provides a url-encoded select="title"):
- cURL
- Fetch API
curl -X 'GET' \
  'http://<your_API_url>/todo/2?select=%5B%22title%22%5D' \
  -H 'accept: application/json' \
  -H 'Authorization: Bearer eyJhbGciOiJIUzI1NiIsInR5cCI6IkpXVCJ9.eyJpZCI6MSwiaWF0IjoxNjk4MzM4MzcwLCJleHAiOjE2OTgzNDE5NzB9.O2ra-nLrTB5v1VCZhuANcH0MOq-S4ij_HNxjv_9O6Fk'
const response = await fetch(
  "http://<your_API_url>/todo/2?select=%5B%22title%22%5D",
  {
    headers: {
      authorization:
        "Bearer eyJhbGciOiJIUzI1NiIsInR5cCI6IkpXVCJ9.eyJpZCI6MSwiaWF0IjoxNjk1NTU4OTM3LCJleHAiOjE2OTU1NjI1Mzd9.FPCVSf_akdRPvBQO7Jmeu7_GlX2zVquNbHtx0TAjxKM",
    },
  }
);

const data = await response.json();

console.log(data);
5. PUT /todo/{id}
Use this to update an existing entity.
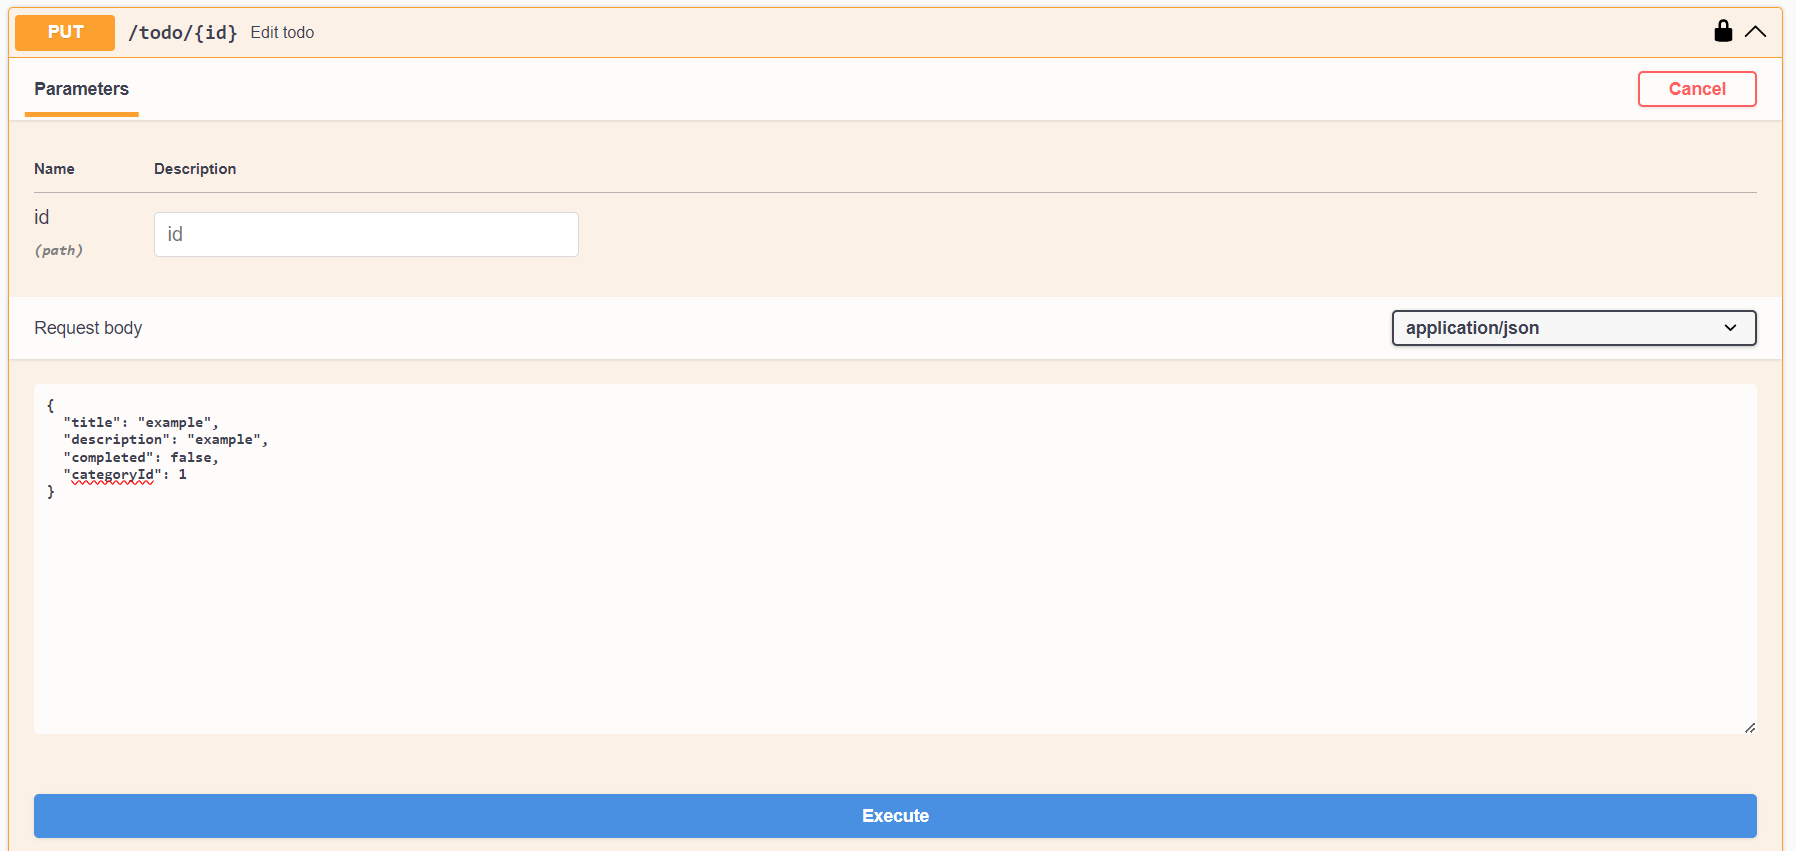
It requires a path parameter
idand the new data in the request body.
- cURL
- Fetch API
curl -X 'PUT' \
  'http://<your_API_url>/todo/2' \
  -H 'accept: application/json' \
  -H 'Authorization: Bearer eyJhbGciOiJIUzI1NiIsInR5cCI6IkpXVCJ9.eyJpZCI6MSwiaWF0IjoxNjk1NTYyOTI2LCJleHAiOjE2OTU1NjY1MjZ9.VAalnR5hk8EOe71_htvx1li2jUXL-cwtzo0lU9vKhiQ' \
  -H 'Content-Type: application/json' \
  -d '{
  "title": "newExample",
  "description": "newExample",
  "completed": true,
  "categoryId": 1
}'
const response = await fetch("http://<your_API_url>/todo/2", {
  method: "PUT",
  headers: {
    authorization:
      "Bearer eyJhbGciOiJIUzI1NiIsInR5cCI6IkpXVCJ9.eyJpZCI6MSwiaWF0IjoxNjk1NTYyOTI2LCJleHAiOjE2OTU1NjY1MjZ9.VAalnR5hk8EOe71_htvx1li2jUXL-cwtzo0lU9vKhiQ",
    "Content-Type": "application/json",
  },
  body: JSON.stringify({
    title: "newExample",
    description: "newExample",
    completed: true,
    categoryId: 1,
  }),
});

const data = await response.json();

console.log(data);
6. PUT Using x-www-form-urlencoded
- cURL
- Fetch API
curl -X 'PUT' \
  'http://<your_API_url>/todo/2' \
  -H 'accept: application/json' \
  -H 'Authorization: Bearer eyJhbGciOiJIUzI1NiIsInR5cCI6IkpXVCJ9.eyJpZCI6MSwiaWF0IjoxNjk1NTYyOTI2LCJleHAiOjE2OTU1NjY1MjZ9.VAalnR5hk8EOe71_htvx1li2jUXL-cwtzo0lU9vKhiQ' \
  -H 'Content-Type: application/x-www-form-urlencoded' \
  -d 'title=newExample&description=newExample&completed=true&categoryId=1'
const response = await fetch("http://<your_API_url>/todo/2", {
  method: "PUT",
  headers: {
    authorization:
      "Bearer eyJhbGciOiJIUzI1NiIsInR5cCI6IkpXVCJ9.eyJpZCI6MSwiaWF0IjoxNjk1NTYyOTI2LCJleHAiOjE2OTU1NjY1MjZ9.VAalnR5hk8EOe71_htvx1li2jUXL-cwtzo0lU9vKhiQ",
    "Content-Type": "application/x-www-form-urlencoded",
  },
  body: new URLSearchParams({
    title: "newExample",
    description: "newExample",
    completed: true,
    categoryId: 1,
  }),
});

const data = await response.json();

console.log(data);
Note that you are able to provide only the fields that you want to actually update/change, no need to provide a value for other fields, it will automatically know not to change it and take its current value.
7. DELETE /resource/{id}
Use this endpoint to delete an existing resource.

It requires an
idpath parameter.
- cURL
- Fetch API
curl -X 'DELETE' \
  'http://<your_API_url>/todo/2' \
  -H 'accept: application/json' \
  -H 'Authorization: Bearer eyJhbGciOiJIUzI1NiIsInR5cCI6IkpXVCJ9.eyJpZCI6MSwiaWF0IjoxNjk1NTYyOTI2LCJleHAiOjE2OTU1NjY1MjZ9.VAalnR5hk8EOe71_htvx1li2jUXL-cwtzo0lU9vKhiQ'
const response = await fetch("http://<your_API_url>/todo/2", {
  method: "DELETE",
  headers: {
    authorization:
      "Bearer eyJhbGciOiJIUzI1NiIsInR5cCI6IkpXVCJ9.eyJpZCI6MSwiaWF0IjoxNjk1NTYyOTI2LCJleHAiOjE2OTU1NjY1MjZ9.VAalnR5hk8EOe71_htvx1li2jUXL-cwtzo0lU9vKhiQ",
  },
});

const data = await response.json();

console.log(data);
File Upload
In the API Playground, you will always see an endpoint that you can use to upload files to a persistant storage.

Currently, You can use this endpoint to upload files with a max size of 5MB, this won't be useful for audio and video since it is usually much larger. It supports images the best especially when it comes to previewing files in the Admin CMS, but by the time you use it, we might've already added better support for more file types.
Usage
It is straightforward to upload files, open the endpoint and click on Try it out:
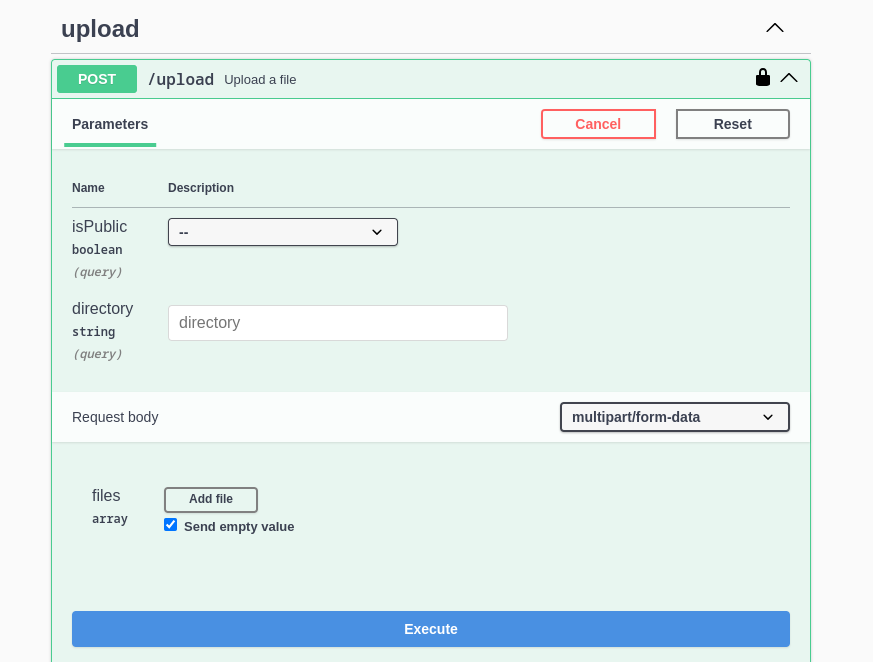
This endpoint accepts two optional parameters:
- isPublic: whether the uploaded files should be considered public or not.
- directory: the directory in which you want to save these files (single
directorycan hold multiple files).
Note that public files are grouped under a single directory called
public.
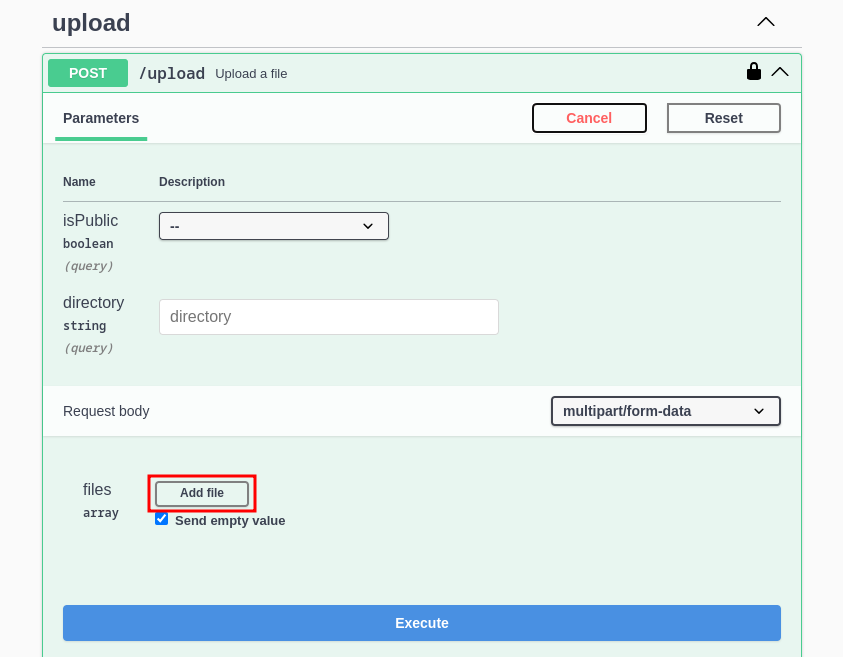
Click on Add file to start adding files from your device:
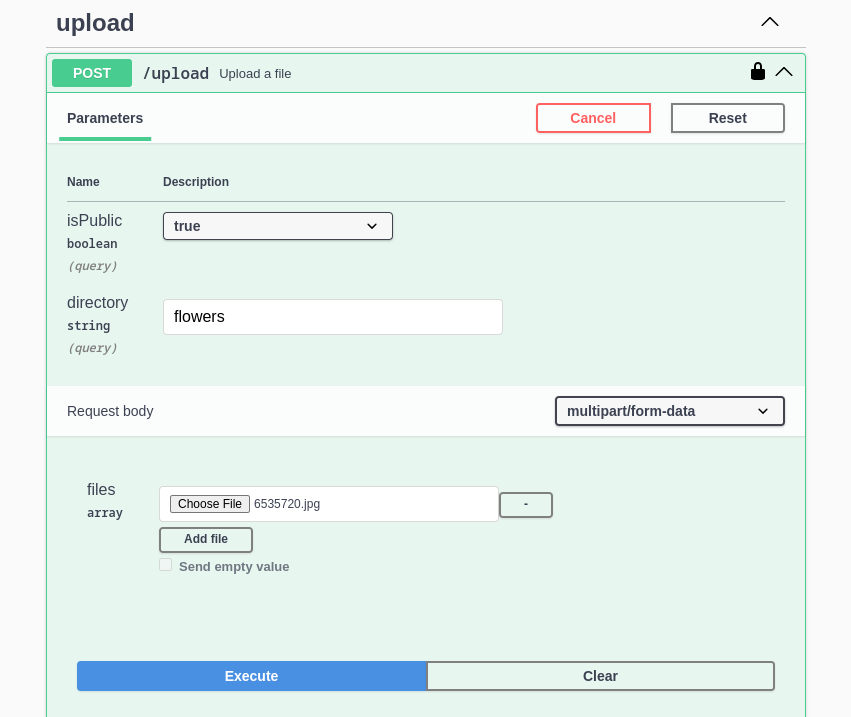
Upload files using Choose file, and click on Add file if you need to add additional files, then proceed to execute:
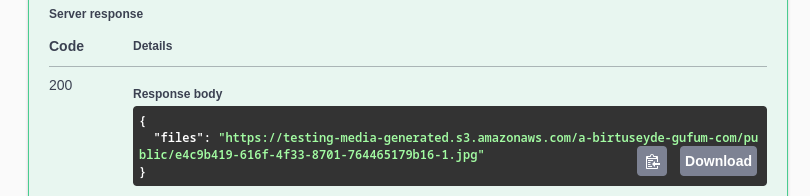
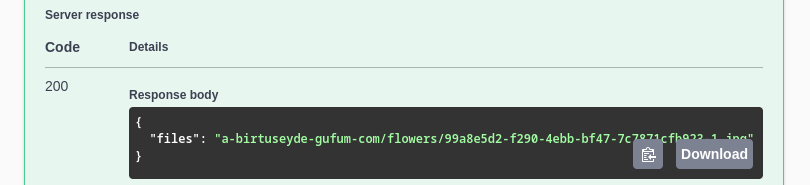
If you chose to make the file public, the endpoint will respond with a direct link to access/download that file:
Otherwise, meaning it is not a public file, the endpoint will respond with a key:
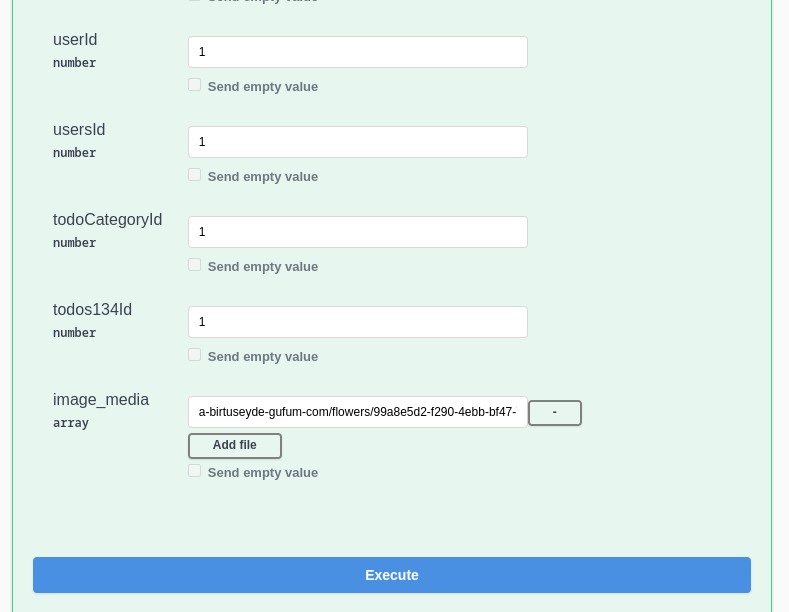
Then, if you want to relate/connect that uploaded file with an entity (the entity must have a field of type media), you must copy the key, then either use the POST endpoint for that entity and send the key in a media field for that entity.
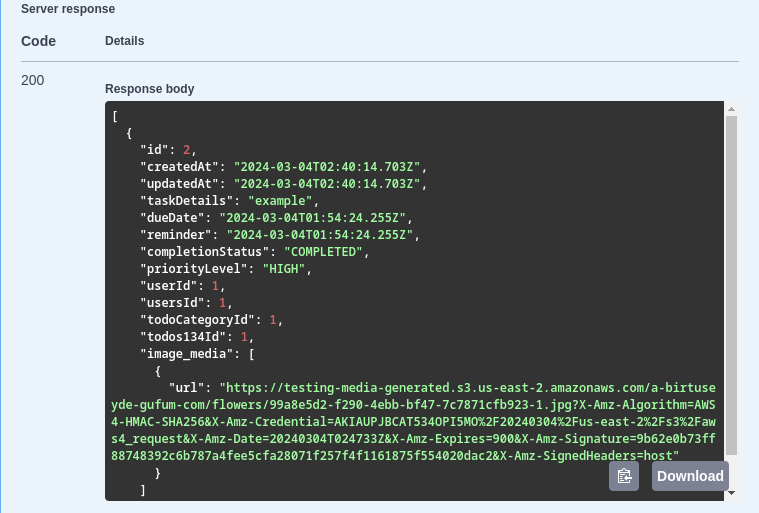
From now on, when you execute a GET request on that entity, it will send back safe presigned URLs for your media files that you can use.
Roles & Permissions
We use roles and permissions to restrict the ability to perform certain actions. The default account that we create for you is going to have admin permissions so you are allowed to perform all kind of create/read/update/delete actions on all entities, other users will have a regular access permission by default so someone with higher permissions should be able to assign them other higher permissions if you want them to be able to perform restricted actions.
Roles
Roles are just named containers for permissions for easier assignment, a role can own multiple permissions.
For example (admin and regular roles):
[
  {
    id: 1,
    createdAt: "2023-10-26T20:42:48.185Z",
    updatedAt: "2023-10-26T20:42:48.185Z",
    name: "admin",
    description: null,
  },
  {
    id: 3,
    createdAt: "2023-10-26T20:43:17.409Z",
    updatedAt: "2023-10-26T20:43:17.409Z",
    name: "regular",
    description: "regular role",
  },
];
Also all users have a specific role having their name created by default, for example:
{
  "id": 1,
  "createdAt": "2023-10-31T00:15:07.354Z",
  "updatedAt": "2023-10-31T00:15:07.354Z",
  "name": "Jack",
  "description": null
}
this role is useful if you want to make this user (and only this user) to be able to perform some actions, then you can attach the suitable permissions to this role and only this user will be able to perform these actions.
Permissions
Each permission allows certain action on a specific entity.
Example permissions for this generated app:
[
  {
    id: 1,
    createdAt: "2023-10-26T20:43:17.219Z",
    updatedAt: "2023-10-26T20:43:17.219Z",
    name: "create:user:*",
    description: "permission to create user",
  },
  {
    id: 2,
    createdAt: "2023-10-26T20:43:17.232Z",
    updatedAt: "2023-10-26T20:43:17.232Z",
    name: "read:user:*",
    description: "permission to read user",
  },
  {
    id: 3,
    createdAt: "2023-10-26T20:43:17.240Z",
    updatedAt: "2023-10-26T20:43:17.240Z",
    name: "update:user:*",
    description: "permission to update user",
  },
  {
    id: 4,
    createdAt: "2023-10-26T20:43:17.248Z",
    updatedAt: "2023-10-26T20:43:17.248Z",
    name: "delete:user:*",
    description: "permission to delete user",
  },
  {
    id: 5,
    createdAt: "2023-10-26T20:43:17.256Z",
    updatedAt: "2023-10-26T20:43:17.256Z",
    name: "create:todo:*",
    description: "permission to create todo",
  },
];
For example, the create:todo:* permission will allow the create action on the todo entity for * (all) rows.
Note that by
createaction we meanPOSTrequests.
a junction table (RolePermission) will relate roles with permissions so that a role can have many permissions and a permission can be shared by multiple roles, then another junction table (RoleUser) will assign each user one or many roles.
Custom Permissions
You can create custom permissions to get more fine-grained control over resource access and the default permissions are not enough for you.
You use this endpoint to create permissions:
an example new custom permission should follow this format:
{
  "name": "permission to <create|read|update|delete> <entity_name>",
  "description": "<create|read|update|delete>:<entity_name>:<rows|*>"
}
for example:
{
  "name": "permission to create currency",
  "description": "create:currency:*"
}
If you attach this permission to a role using the rolePermission junction table (POST /rolePermission endpoint), then anyone having this role will be able to create currencies.
Higher Permissions
It is simple to elevate someone's permissions. To give a user higher permissions (assuming you are an admin or have permissions assign new roles to users), you just need to assign him a new role in the roleUser junction table in a record like this:
{
  "userId": 5,
  "roleId": 3
}
using this endpoint:
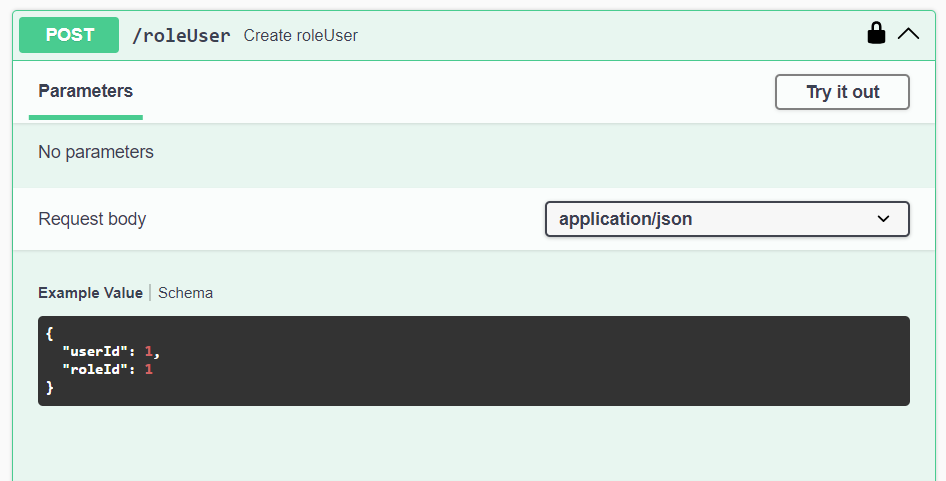
He will get assigned a new role with the id roleId and will inherit all permissions included in that role.
Data Mutations Permissions
Note that by default any newly created user who is not an admin will have two roles (regular and another role with his own name), both of these won't give him the ability to Mutate tables/entities (create/update/delete) and you will have to explicitly set these permissions on the role having his own name, the easiest way to do it is through the admin panel.
Navigate to RolePermission:
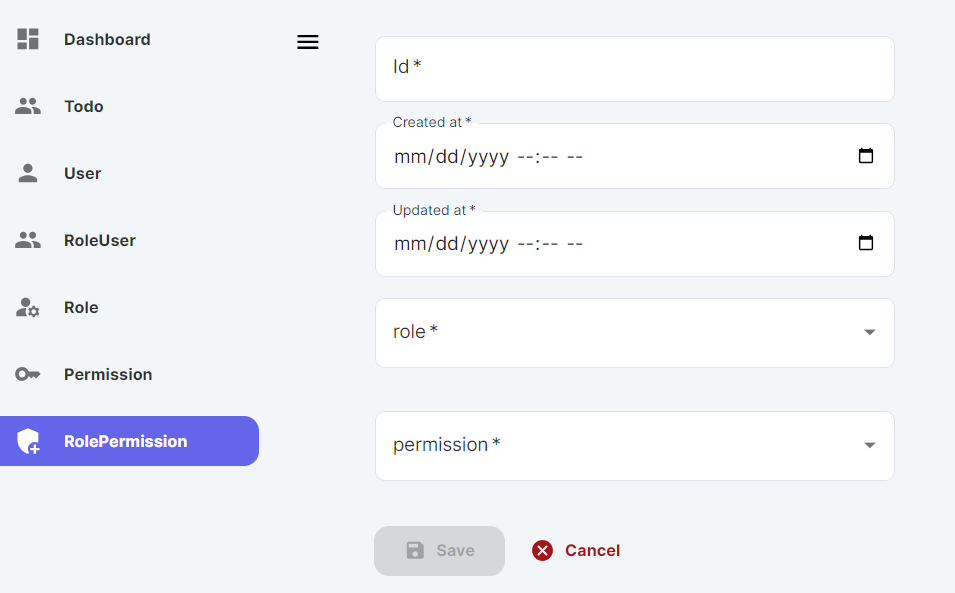
And just fill the id, createdAt, and updatedAt (make sure the id is unique and not used before, otherwise will fail), then choose the role with the name of the newly created user and choose the permission from a dropdown list.
for example:
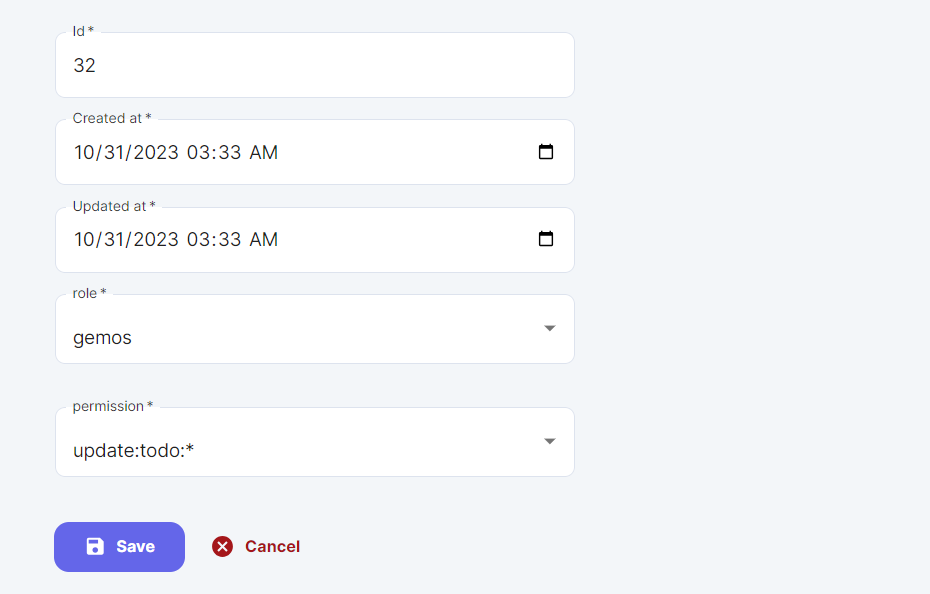
click on save to finish giving a new permission to the newly created user.
Querying Related Data
AppAsap powers your API with an easy interface to react with related data all you need is to ask for what you want using select query parameter, here is an example.
One-to-One & One-to-Many
suppose we have those two tables with relation post has many comment:
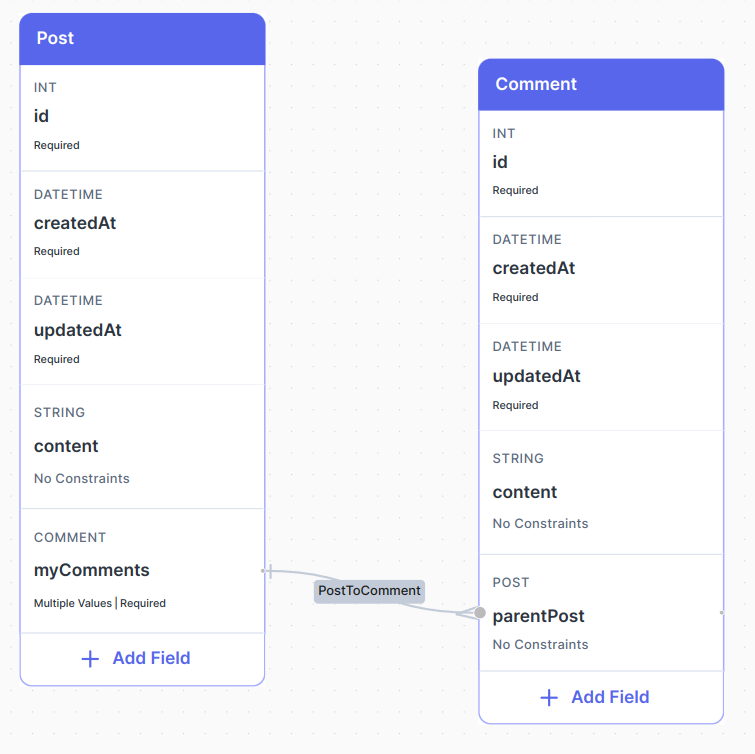
1. Get all posts including their comments
all we need to do is to select the relation fields content and myComments:
Important Note: all
GETmethodcURLrequests below need to encode query parameters but wasn't encoded just to make it readable, for example, in Javascript to encode a query parameters you can use theencodeURIComponent()function.
- cURL
- Fetch API
curl -X 'GET' \
  'http://<your_API_url>/post?select=["content","myComments"]' \
  -H 'accept: application/json' \
  -H 'Authorization: Bearer eyJhbGciOiJIUzI1NiIsInR5cCI6IkpXVCJ9.eyJpZCI6MSwiaWF0IjoxNjk1NTYyOTI2LCJleHAiOjE2OTU1NjY1MjZ9.VAalnR5hk8EOe71_htvx1li2jUXL-cwtzo0lU9vKhiQ'
const qs = new URLSearchParams();
qs.append("select", '["content","myComments"]');

const response = await fetch(`http://<your_API_url>/post?${qs.toString()}`, {
  method: "GET",
  headers: {
    authorization:
      "Bearer eyJhbGciOiJIUzI1NiIsInR5cCI6IkpXVCJ9.eyJpZCI6MSwiaWF0IjoxNjk1NTYyOTI2LCJleHAiOjE2OTU1NjY1MjZ9.VAalnR5hk8EOe71_htvx1li2jUXL-cwtzo0lU9vKhiQ",
  },
});

const data = await response.json();

console.log(data);
simply you will get:
[
  {
    content: "Seize the moment !!",
    myComments: [
      {
        id: 3,
        createdAt: "2023-10-25T06:46:17.328Z",
        updatedAt: "2023-10-25T06:46:17.328Z",
        content: "exactly !!",
        postId12: 1,
      },
    ],
  },
  {
    content: "Simplicity Favors Regularity !",
    myComments: [
      {
        id: 1,
        createdAt: "2023-10-25T06:45:34.256Z",
        updatedAt: "2023-10-25T06:45:34.256Z",
        content: "that's great !",
        postId12: 2,
      },
      {
        id: 2,
        createdAt: "2023-10-25T06:46:06.114Z",
        updatedAt: "2023-10-25T06:46:06.114Z",
        content: "have a great day !",
        postId12: 2,
      },
    ],
  },
];
2. Get Comment including its Post
- cURL
- Fetch API
curl -X 'GET' \
  'http://<your_API_url>/comment?select=["content","parentPost"]' \
  -H 'accept: application/json' \
  -H 'Authorization: Bearer eyJhbGciOiJIUzI1NiIsInR5cCI6IkpXVCJ9.eyJpZCI6MSwiaWF0IjoxNjk1NTYyOTI2LCJleHAiOjE2OTU1NjY1MjZ9.VAalnR5hk8EOe71_htvx1li2jUXL-cwtzo0lU9vKhiQ'
const qs = new URLSearchParams();
qs.append("select", '["content","parentPost"]');

const response = await fetch(`http://<your_API_url>/comment?${qs.toString()}`, {
  method: "GET",
  headers: {
    authorization:
      "Bearer eyJhbGciOiJIUzI1NiIsInR5cCI6IkpXVCJ9.eyJpZCI6MSwiaWF0IjoxNjk1NTYyOTI2LCJleHAiOjE2OTU1NjY1MjZ9.VAalnR5hk8EOe71_htvx1li2jUXL-cwtzo0lU9vKhiQ",
  },
});

const data = await response.json();

console.log(data);
you will get:
[
  {
    content: "that's great !",
    parentPost: {
      id: 2,
      createdAt: "2023-10-25T06:45:17.979Z",
      updatedAt: "2023-10-25T06:45:17.979Z",
      content: "Simplicity Favors Regularity !",
    },
  },
  {
    content: "have a great day !",
    parentPost: {
      id: 2,
      createdAt: "2023-10-25T06:45:17.979Z",
      updatedAt: "2023-10-25T06:45:17.979Z",
      content: "Simplicity Favors Regularity !",
    },
  },
  {
    content: "exactly !!",
    parentPost: {
      id: 1,
      createdAt: "2023-10-25T06:44:55.766Z",
      updatedAt: "2023-10-25T06:44:55.766Z",
      content: "Seize the moment !!",
    },
  },
];
3. You can also select specific fields from the relation
- cURL
- Fetch API
curl -X 'GET' \
  'http://<your_API_url>/comment?select=["content",{"parentPost":["content"]}]' \
  -H 'accept: application/json' \
  -H 'Authorization: Bearer eyJhbGciOiJIUzI1NiIsInR5cCI6IkpXVCJ9.eyJpZCI6MSwiaWF0IjoxNjk1NTYyOTI2LCJleHAiOjE2OTU1NjY1MjZ9.VAalnR5hk8EOe71_htvx1li2jUXL-cwtzo0lU9vKhiQ'
const qs = new URLSearchParams();
qs.append("select", '["content",{"parentPost":["content"]}]');

const response = await fetch(`http://<your_API_url>/comment?${qs.toString()}`, {
  method: "GET",
  headers: {
    authorization:
      "Bearer eyJhbGciOiJIUzI1NiIsInR5cCI6IkpXVCJ9.eyJpZCI6MSwiaWF0IjoxNjk1NTYyOTI2LCJleHAiOjE2OTU1NjY1MjZ9.VAalnR5hk8EOe71_htvx1li2jUXL-cwtzo0lU9vKhiQ",
  },
});

const data = await response.json();

console.log(data);
result:
[
  {
    content: "that's great !",
    parentPost: {
      content: "Simplicity Favors Regularity !",
    },
  },
  {
    content: "have a great day !",
    parentPost: {
      content: "Simplicity Favors Regularity !",
    },
  },
  {
    content: "exactly !!",
    parentPost: {
      content: "Seize the moment !!",
    },
  },
];
Many-to-Many
suppose the following schema where post has many categories and category has many posts:
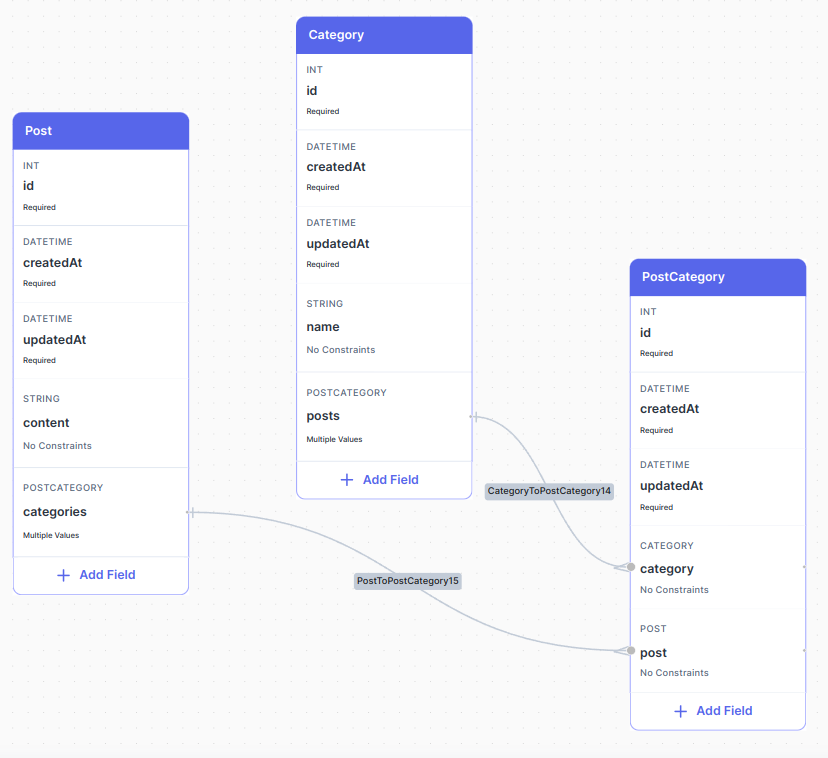
1. Get all posts including their categories
just select the first relation field categories from post end point then nest it with category relation field to get data from category entity
- cURL
- Fetch API
curl -X 'GET' \
  'http://<your_API_url>/post?select=["content",{"categories":["category"]}]' \
  -H 'accept: application/json' \
  -H 'Authorization: Bearer eyJhbGciOiJIUzI1NiIsInR5cCI6IkpXVCJ9.eyJpZCI6MSwiaWF0IjoxNjk1NTYyOTI2LCJleHAiOjE2OTU1NjY1MjZ9.VAalnR5hk8EOe71_htvx1li2jUXL-cwtzo0lU9vKhiQ'
const qs = new URLSearchParams();
qs.append("select", '["content",{"categories":["category"]}]');

const response = await fetch(`http://<your_API_url>/post?${qs.toString()}`, {
  method: "GET",
  headers: {
    authorization:
      "Bearer eyJhbGciOiJIUzI1NiIsInR5cCI6IkpXVCJ9.eyJpZCI6MSwiaWF0IjoxNjk1NTYyOTI2LCJleHAiOjE2OTU1NjY1MjZ9.VAalnR5hk8EOe71_htvx1li2jUXL-cwtzo0lU9vKhiQ",
  },
});

const data = await response.json();

console.log(data);
[
  {
    content: "AppAsap",
    categories: [
      {
        category: {
          id: 4,
          createdAt: "2023-10-25T10:10:01.790Z",
          updatedAt: "2023-10-25T10:10:01.790Z",
          name: "REST",
        },
      },
      {
        category: {
          id: 3,
          createdAt: "2023-10-25T10:09:56.657Z",
          updatedAt: "2023-10-25T10:09:56.657Z",
          name: "graphql",
        },
      },
      {
        category: {
          id: 2,
          createdAt: "2023-10-25T10:09:43.593Z",
          updatedAt: "2023-10-25T10:09:43.593Z",
          name: "frontend",
        },
      },
      {
        category: {
          id: 1,
          createdAt: "2023-10-25T10:09:39.582Z",
          updatedAt: "2023-10-25T10:09:39.582Z",
          name: "backend",
        },
      },
    ],
  },
  {
    content: "How to build scalable backend ",
    categories: [
      {
        category: {
          id: 2,
          createdAt: "2023-10-25T10:09:43.593Z",
          updatedAt: "2023-10-25T10:09:43.593Z",
          name: "frontend",
        },
      },
      {
        category: {
          id: 1,
          createdAt: "2023-10-25T10:09:39.582Z",
          updatedAt: "2023-10-25T10:09:39.582Z",
          name: "backend",
        },
      },
    ],
  },
];